

So you’ve simply got your new iPhone. perhaps it’s your 1st iPhone. in this case, welcome to the family, it’s getting to be nice (for the foremost part). If you’re unaccustomed this object, you may be inquisitive however precisely to urge started. Apple encompasses a long and elaborated setup wizard however they don’t offer vital data or context. however that’s why we’re here.
Read on as we’ll assist you on each step on the manner, advising you on what to try to and what to not.

How to Set Up Your New iPhone seven, iPhone seven and, iPhone 6s, iPhone 6s and and iPhone SE
Note: You’ll have to be compelled to insert a SIM card within the iPhone to activate it.
1. Turn on And Press the Home Button

Once you’ve got your iPhone, press and hold the Sleep/Wake button. You’ll realize it on the top/side counting on your model. Then you’ll be greeted with an easy “Hello” screen. Press the “Home” button to start out the setup.
2. Set Language and Region

Firstly, you’ll have to be compelled to choose your language and country from an extended list. If to procure your device in your country, the presets here won’t want piece of writing and you'll be able to simply faucet on “Next” to maneuver on.
3. Connect with Wi-Fi
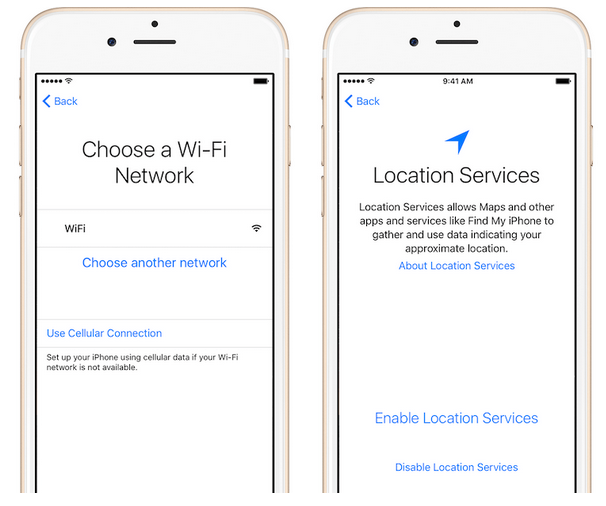
From this page, you’ll be able to choose a primary Wi-Fi network to attach your iPhone. choose the network so enter the arcanum to urge started.
Should you?: This isn’t mandatory however you most likely ought to hook up with your home’s Wi-Fi network to create the remainder of the setup method less complicated.
No Wi-Fi Network? If you aren’t around a Wi-Fi network and your information isn’t operating, however you wish to alter the device, swipe down and faucet on the choice for victimization iTunes. Then connect your device to a pc and use iTunes to activate and adjust the device (only do that if you’re getting to adjust your iPhone with this pc from currently on).
4. alter Location Services
Location Services permits apps like Maps to relinquish you directions and for realize My iPhone to well, realize your iPhone. It’s Apple’s name for GPS access (for the OS and apps). you'll be able to faucet on “Enable Location Services” to alter it or “Disable Location Services” if you don’t.
Should you?: affirmative. Don’t worry, you’ll be able to deny GPS access to apps after you 1st use them. And you'll be able to reverse the choice later from Settings also. Location Services makes your life easier.
5. Activate iPhone
Once the Wi-Fi network is enabled, Apple can try and really activate your iPhone. confirm the SIM is inserted properly.
You’ll see the sign on the screen. If it’s your variety then faucet “Next”. On subsequent screen, sort the request code and therefore the last four digits of your Social Security variety. This step is for U.S. solely.
6. Setup Touch ID and Passcode

You’re in all probability fitting Associate in Nursing iPhone that encompasses a inbuilt bit ID device. this can be wherever you’ll be able to scan a finger to alter unlocking your phone victimization your finger and for Apple Pay. Once you’ve done that, you’ll conjointly have to be compelled to produce a half-dozen digit passcode that works as a backup to the bit ID scan.
Should you?: affirmative! after all. If you’re not too continue the fingerprint then you a minimum of ought to produce a powerful passcode. faucet on “Passcode Options” for even stronger passcode choices.
7. Setting It Up

The following screen is named "Applications and Data". From here you must make your psyche up what state you wish your iPhone to be.
Reestablish for iCloud Backup licenses you to reestablish a reinforcement of your data and applications from a past iCloud Backup (in the event that you've had any).
Reestablish from iTunes Backup licenses you to reestablish a device from the iTunes reinforcement you keep going made on your pc. For this, you may must be constrained to connect your iPhone to the pc exploitation the Lightning link.
Set Up As New iPhone grants you in any case a new, clean iPhone. On the off chance that this can be your first iPhone, this can be what you should do.
Move data from robot licenses you to exchange things like contacts and photographs from your machine telephone. For this, you'll must be constrained to introduce the Move to iOS application on machine and attempt every gadgets. The exchange happens remotely. By and by, I wouldn't recommend this course thus of the robot application is quite carriage and along these lines the strategy for exchanging is annoyingly moderate. It's higher to setup the iPhone as new and utilize outsider utilities to exchange the crucial data.
8.Create Apple ID

From this screen, you'll have the capacity to either sign on together with your Apple ID or create a substitution one if this can be your first time inside the Apple conspire. making Associate in Nursing ID is entirely direct. You'll must be constrained to enter your birthday, name and email account.
Should you?: certifiable. Accomplishing something crucial, such as putting in applications or making FaceTime choice needs Associate in Nursing Apple ID.
9. Add a Credit or Debit Card
This screen licenses you to highlight a credit/charge card and connection it to your Apple ID. you'll have the capacity to avoid this technique by sound the "Set Up Later in Wallet" plausibility. In case you're in an extremely upheld district, you'll even be requested that confirm the cardboard to highlight it for Apple Pay.
Should you?: Yes, on the off chance that you expect on purchasing applications, music from iTunes or exploitation Apple Pay in your space.
10. Adjust iCloud
From this screen, you can select to either use iCloud or not. iCloud is not the same as Apple ID. iCloud is Apple’s own online sync/backup service. It lets you do things like backup your photos, use data sync for apps like Pages and Notes, back up your phone over the internet, use Apple Music and more. It also lets you use iCloud Drive for storing all sorts of files (it’s similar to Dropbo
Should you?: Yes. On the off chance that you lead a dynamic web life, you'll have to empower iCloud.
11. Empower iCloud Keychain
This progression just shows up on the off chance that you've ever empowered iCloud Keychain on another gadget utilizing a similar ID (from your Mac, for instance). iCloud Keychain gives you a chance to share login subtle elements between various gadgets safely. In the event that you have a Keychain, you can either endorse from horns gadget (a popup will show up) or enter your security code.
On the off chance that you would prefer not to empower and utilize this component, tap "Don't Restore Passwords".
Should you?: Probably not. iCloud Keychain is a high support include (as a security highlight ought to be). Yet, its trickiness makes it difficult to deal with this component between numerous gadgets. I would propose you utilize an outsider device like LastPass or 1Password to store and match up secure data like logins and Visa points of interest.
12. Empower Siri

From this page, you'll have the capacity to empower Apple's own right hand, Siri. In case you're utilizing an iPhone 6s or higher, you'll additionally have the capacity to set up "Hello Siri" that gives you a chance to utilize the element without touching the iPhone.
Tap on "Set up Siri" to begin or "Turn on Siri Later" to skip.
Should you?: Yes. Siri is no place as marvelous as Google's partner yet it's truly valuable for doing straightforward things like calling individuals, communicating something specific or simply playing some music.
13. Share Diagnostic Information
This screen inquires as to whether you're willing to share analytic data to Apple. It's done safely obviously and just happens when there's an issue with the gadget – sudden crashes for instance. This is absolutely discretionary.
14. Empower Display Zoom
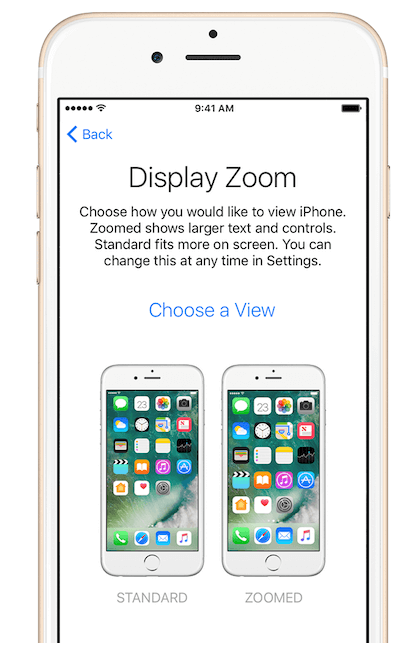
Tap on the "Zoomed" catch to perceive how it would look and empower it.
Should you?: If you have issues with perusing content on screen, or frail vision then yes, empower it.
15. Arrange the New Home Button

This is the last stride of the procedure and just shows up in the event that you have an iPhone 7 or iPhone 7 Plus. This is to do with the new, not so much a-catch capacitive Home catch in the new iPhone.
As this is truly a capacitive catch, this screen gives you a chance to redo the criticism. Fundamentally, how would you need the Home catch to feel. 1 implies you'll get a light criticism from the Taptic motor. 2 is medium (the default and the "ordinary"). 3 implies a high vibration input.
That is It, You're In
You survived the iPhone's onboarding procedure and your reward is gazing you, appropriate in your face. You'll see the Home screen now and this is the place the fun begins. Investigate the implicit applications, download magnificent new applications from the App Store, anything you need.
Like this post? Share it!


0 Comments